當網段都規劃好cisco 3750也設定好了以後,接下來我要進行的就是兩台juniper srx 240 的設定。
基本上此次240設定的工作就是把HA設定好讓內部網段可以上網就完成目標,VPN就交給國外設定。
Juniper SRX 要做HA前要先確認的東西就兩台型號 OS及Modules 都要相同
很幸運的 我這邊兩台是馬來西亞那邊沒再用的最早也是設定HA。
因為對juniper 不熟,所以只能google 找一下相關資源
官方有一個網站(如下)可以輸入相關資訊後把conf 產生出來非常方便
http://www.juniper.net/support/tools/srxha/
網路上找了SRX240的圖片如下
先說明一下HA會用到的interface
fxp0: management interface
fxp1: control link
fab : data link
swfab : switching data link
reth : redundant pseudo-interface
fxp1 功能:
1. Heartbet
2. conf 同步
fab 功能
1. RTO(Real Time Object)
2.traffic
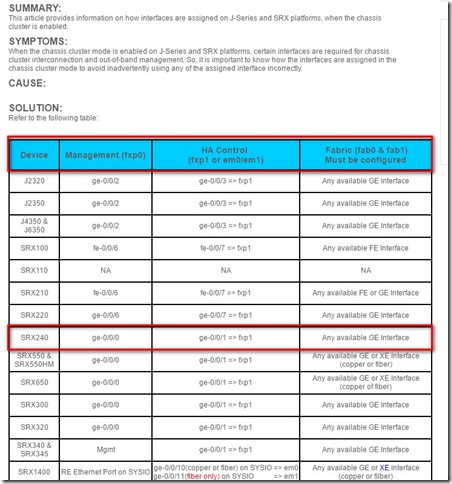
每一各型號可以用的port定義可能會不同可以參考下面網址找到要設定的型號
https://kb.juniper.net/InfoCenter/index?page=content&id=KB15356&actp=search
目前我的型號240 就如下圖
依照上圖查到的我先定義號我要用的port
node0 : ge-0/0/0 管理IP
node1 : ge-0/0/0 管理IP
node0 : ge-0/0/1 HA control
node1 : ge-0/0/1 HA control
node0 : ge-0/0/2 RTO
node1 : ge-0/0/2 RTO
node0 : ge-0/0/3 內部IP
node1 : ge-0/0/3 內部IP
node0 : ge-0/0/4 isp1
node1 : ge-0/0/4 isp1
node0 : ge-0/0/5 isp2
node1 : ge-0/0/5 isp2
小插曲:
因為不知道root密碼所以參考下面的文件將root 密碼 reset
密碼reset 後,確定可以登入,但詢問我的廠商後要做HA他的習慣就是把所有設定清空
清空的方式
直接是conf 模式
下 delete 選yes 然後重新設定一組root password (指令如下紅色字體,我是用console 連然後兩台都做好後,重開機)
root# delete
This will delete the entire configuration
Delete everything under this level? [yes,no] (no) yes
root@host# set system root-authentication plain-text-password
New password:
Retype new password:
root@host# commit
HA設定:
除非沒有做HA,否則HA設定一定是做優先做
首先將兩台 HA相關的port 對接起來 (如下)
node0 : ge-0/0/1 HA control
node1 : ge-0/0/1 HA control
node0 : ge-0/0/2 RTO
node1 : ge-0/0/2 RTO
兩台個別做
NODE1:
set chassis cluster cluster-id 1 node 0 reboot
NODE2:
set chassis cluster cluster-id 1 node 1 reboot
cluster-id 1-15 node 0 or 1 ,cluster-id 須設定相同
兩台重開機後:
查詢cluster 狀態(正常應該如下圖)
root> show chassis cluster status
以上就完成HA的設定
接下來都在primary 做就可以:
set groups node0 system host-name SRX_0=>設定 NODE0 HOSTNAME
set groups node0 set interface fxp0 unit 0 family inet address 10.65.114.1/23 =>設定NODE0 管理ip 在GE-0/0/0
set groups node1 system host-name SRX_1 =>設定 NODE1 HOSTNAME
set groups node1 interface fxp0 unit 0 family inet address 10.65.114.2/23 =>設定NODE1 管理ip 在GE-0/0/0
set apply-groups “${node}” => HA group的成員node代號
設定data link interface
set interfaces fab0 fabric-options member-interfaces ge-0/0/2
set interfaces fab1 fabric-options member-interfaces ge-5/0/2
設定redundancy-group (以下的設定是利用官方提供的設定檔配置產生網頁做出來的)
set chassis cluster reth-count 3 =>設定有幾個介面,內部,isp1,isp2 所以是3
set chassis cluster redundancy-group 0 node 0 priority 200
set chassis cluster redundancy-group 0 node 1 priority 100
set chassis cluster redundancy-group 1 node 0 priority 200
set chassis cluster redundancy-group 1 node 1 priority 100
set interfaces ge-0/0/3 gigether-options redundant-parent reth0
set interfaces ge-0/0/4 gigether-options redundant-parent reth1
set interfaces ge-0/0/5 gigether-options redundant-parent reth2
set interfaces ge-5/0/3 gigether-options redundant-parent reth0
set interfaces ge-5/0/4 gigether-options redundant-parent reth1
set interfaces ge-5/0/5 gigether-options redundant-parent reth2
set interfaces reth0 redundant-ether-options redundancy-group 1
set interfaces reth0 unit 0 family inet address 10.65.113.253/23
set interfaces reth1 redundant-ether-options redundancy-group 1
set interfaces reth1 unit 0 family inet address 1.1.1.1/24 => 這裡是ISP線路IP
set interfaces reth2 redundant-ether-options redundancy-group 1
set interfaces reth2 unit 0 family inet address 2.2.2.2/24 => 這裡是ISP線路IP
set security zones security-zone Trusted host-inbound-traffic system-services all
set security zones security-zone Trusted interfaces reth0.0
set security zones security-zone Untrusted interfaces reth1.0
set security zones security-zone Untrusted interfaces reth2.0
其他設定
設定web console
set system services web-management https system-generated-certificate
set system services web-management http interface ge-0/0/3
set system services web-management https interface ge-0/0/3.0
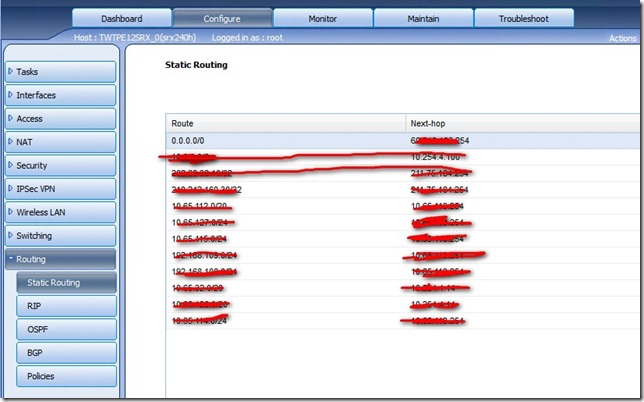
設定static routing
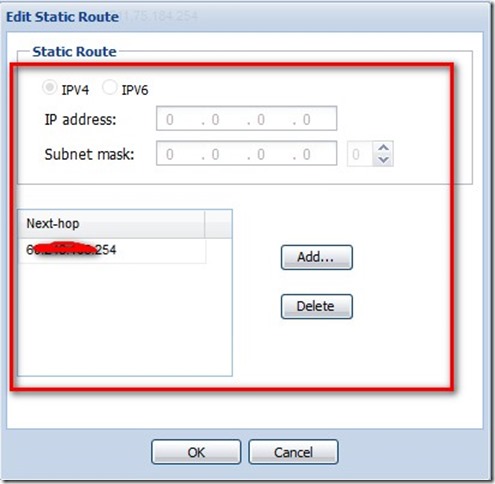
利用web 來設定上網走第一條線路
點選 Routing => static routing 來新增
最後還要設定 policy and secure NAT 後用戶端就可以上網
可以參考之前的的文章
https://blog.pmail.idv.tw/?p=13998


设定了HA如何进web做其他设定?谢谢
您好
你應該有設定其中一個介面為內部網段並指定IP,就是用這IP 連線
谢谢。可以了。。可以问下为何我的trusted zone device ping不到untrusted zone device吗?全部service都开了。就是any to any.是不是要加ip address在zone.玩了好久都不行。谢谢你的帮忙。
zh1_om1 “Firewall 1
192.168.1.11”
192.168.5.101
ic01sdc
zh2_om1 192.168.1.101
192.168.5.102
Untrusted Trusted
gd1_om1 Switch Switch
192.168.5.103
HA
Ngoshawk
172.18.1.30
Ncuckoo ic02sdc
172.18.1.29 “Firewall 2
192.168.1.12” 192.168.1.102
PI_ICCP
10.130.21.152
这样要如何做配置让trusted to untrusted 开通。。
荣哥,谢谢你的帮忙
您好
開雙向icmp 看看,另外設備有允許ping 嗎?
有,都开了。如何开双向icmp? firewall filter那做吗?
您好
應該是說你的trust to untrust 和 untrust to trust 的policy 要設定 我能想的就是這裡
荣哥,你好。可以和你拿联络方式吗?
這裡就是聯絡方式囉
好的。谢谢荣哥。。